“Deepen the breath and increase the force in your lines at relatively easy stages, then wait and be patient. Your body will open and let you in when it’s ready. By staying at easy stages of the pose longer, you will increase your strength and endurance.”
Erich Schiffman, Founder of Freedom Style Yoga
Week #6 Yin Pose: Toe Squat to Hero Pose
When we meet difficult life situations with intelligent kindness our view of ourselves and the world brightens. Hero Pose or Virasana is a way of sitting on the floor that nourishes a clear mind, an upright spine, and healthy knee, ankle and arches amidst other benefits. It’s also not attainable to many people. Our feet cramp or the ankles and knees scream. So this week I’m sharing with you three different approaches to this pose for those who shy away from sitting on your heels or just situations in life that appear “too much”. The way we can approach a pose or a life situation that is not accessible is to take it in small bites, go from easiest to hardest and take it slow. When we approach difficult poses and situations skillfully, mindfully and compassionately, they are within our reach.
Precaution Alert: If you have had knee injury, surgery, please use the props skillfully or avoid this pose. Listen to your knees. If your ankles or tops of feet feel the discomfort, come out and in often and/or add more props. (You can also read this article too.)
Approach I: Progressive Interval Training – We start with an easier version of the pose, stay in it for 1:00, increase the intensity of the pose every minute for 5:00 until we can be in the full version of the pose! Let’s try it. The first version of Hero pose is a Toe Squat.
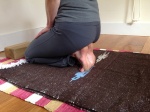
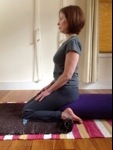
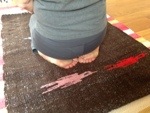
Toe Squats (Stage 1) – Sitting on your Heels, Toes curled under for 1:00
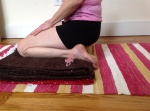
Instructions: Lay 1-3 folded blankets down with 1 or more bricks on top. Kneel down and sit on a brick(s) at medium height with your your toes curled under. If that is very uncomfortable read the Help comments. If this is very comfortable and does not bring you to your first “edge”, try lowering the brick or resting your buttocks on your heels. Take it slow and come in and out of the pose for 1:00 if required. It will come with practice.
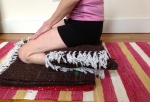
Help!!! Tightness in the knees, or buttocks not reaching the heels: Add folded blankets on top of your bricks between the thighs and shins to create more space for the knees. You can also fold the front of the blanket to shift your weight back away from the knees.
Stiff or tight ankles: Sit on several blankets with the tops of your feet and toes curled off the back or make a narrow blanket roll and place it directly under the ankles with the toes over the edge.
If your foot or calf is cramping that means there is too much pressure there so elevate higher with a cushion or blankets or come and out and in a few times.
***IF NON OF THIS IS ACCESSIBLE TO YOU WITHOUT STRONG DISCOMFORT OR PAIN STOP SEE THE ALTERNATIVES SECTION BELOW.
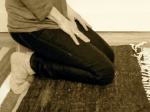
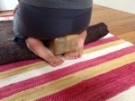
Toe Squats (Stage II) – Sitting on your Heels, Tops of feet on the floor for 1:00
Instructions: Now flip the toes back so that you tops of the feet are resting on the floor. If you are sitting on a brick or bolster the inner seam of your feet are hugging the block or bolster your heels may not be under your hips. If you are not using a block you are sitting on your heels with both your heels and toes together. (no picture for you – oops!) Of course make any of the above suggested adjustments to be more comfortable, especially a folded blanket between the thighs and shins.
Hero Pose (Stage III) – Sitting on your Feet, Toes together and heels apart for 1:00
Instructions: From the last pose lift your buttocks and bring your toes together and heels apart, try to sit on your feet. Otherwise adjust your block and blanket so you can sit back.
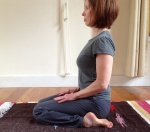
Hero Pose (Final Stage) – Sitting between your feet for 1:00
Instructions: Finally lift your buttocks again and take the toes to the outside of your hips so now the toes point back and your heels are resting just on the outside of the hips. Adjust with props to be more comfortable.
Come out of the pose (Counter pose) – Take time to come out slowly for. We are not used to folding our ankles and knees in this way. Then spend 10 breaths doing a stretch for the back of the knee and ankle such as downward facing dog or calf stretch at the wall in the picture below.
***Alternatives: If you cannot sit on your heels with any of the above support for 1:00 comfortably (ie you wince as you enter the pose) I have two choices for you:
Approach II: Active-Rest Interval Training – Actively try to get into the pose for 1 minute, rest the next. It might look something like this:
1:00 Sitting on our heels with toes curled under
1:00 resting out of the pose
1:00 Sitting on our heels with the tops of the feet on a blanket
1:00 resting out of the pose
1:00 Sitting on our feet with our toes together and heels apart, heels just under the outer edge of the buttocks (with whatever support you need)
And if that is “too much” try:
Approach III: 1 Minute Touch and Go Training – The idea here is to just touch into the sensations of the pose and then come out. Touch: Start by sitting on your heels (with whatever prop set up works best for you) with toes curled under for 1-3 breaths. The average person takes something like 3-4 seconds for one breath. Go: Then rest out of the pose for 5-10 breaths on your knees or stand up. Do this 3-5 x and progress until you can stay for 10 breaths or 1:00 which ever comes first then try the 1-5 Minute Interval Training again. Listen to your joints. Pain in the joints a sign that something you’ve gone past your edge.
Reflection:
Finding our edge is related to finding out more about ourselves. Questions we can reflect on while in the pose: How do I know what’s appropriate for me in a pose or in my life? What am I paying attention to cue me in? What are my signals for what’s appropriate in my life?
Pingback: Playing Your Edge | Yoga Drops
This is a great next pose for me to work with. Another one that is challenging — specifically the very first stage, those dreaded Toe Squats. ACK! I find it hard to believe that any amount of consistency will change the fact that my right big toe Will Not Bend in that direction past a certain point. This is not the same as the resistance of tight muscles — or at least it doesn’t feel that way. It feels like the result of the aging of my feet and more to do with bone. I would be ecstatic if I could change that resistance, so I am happy to have you focusing us on this this week. The fact that my two feet act differently is challenging, also. I can’t settle into an edge for both feet (unless I’m willing to be quite lopsided) because the right big toe is so much less flexible than the left.
I had a great success last week, staying with Shoelace for the extra week, while also doing Swan. Using your suggestion that I do it it up the wall was a magical shift for me. I did that every day, loving it from the moment I started and actually craving it throughout the day until I could get the chance to settle in. Amazing! Doing that was blissful and helped me work on the other versions and stages, too. I am so fond, now, of this once-disliked pose, that I was delighted to see Shoelace featured on the cover of The Complete Guide to Yin book I just bought — the one by Bernie Clark, whom you were raving about. Now I look at that pose and think yay. How wonderful is that?! Thank you, Alexandra!
First off, I’m so happy about your success with Shoelace AND you buying BC’s book. So much good information. Now, the Toe Squat issue. How about trying warming up first with maybe interlacing your fingers and your toes and bending your toes back and forth. (Remember we’ve done that in class?) Maybe also try 5-10 foot circles and pointing and flexing the toes first. Let me know if it helps to get the circulation going. Also pay attention that the big toe doesn’t swell, change color etc. In other words keep an eye on it. And finally take it slow and simply work with the imbalance between right and left (we all have them) as best you can. Thanks so much for sharing your journey.
Oh goodness, i fell out of place trying to focus on some new Yang poses. And here I come back to toe squat. Way to challenge a girl Alexandra…but I will join in again. Will let you know how it is coming later in week.
I guess that’s why it’s called a challenge right?! Can’t wait to hear how it goes.
Interestingly my right foot has given me more trouble than my left which is usually my problem side. I will have to continue to work on this as it does seem to make my feet hurt less when I walk and I have done quite a bit of walking this week. I still can only stay in the pose about a minute at a time. And I can only do that if I do the fingers between my toes first.
It’s so interesting what you are discovering about your body and how doing a simple posture such as hero can enhance basic everyday movements like walking. And bravo for 1:00 intervals with interlacing fingers and toes as a rest period. Remember slow and steady wins the …..
I’ve been reading here but unable to come to class last 2 weeks- I have a very stuffy/runny nose and head- not good for Yin poses, it’s hard to breathe or relax at all.
Hopefully will be back soon…. 🙂 -Lisa
You’re so hot, bitch